Select Page

Smashed Peas

SMASHED PEAS 

It’s fresh peas season so why not try this tasty smashed peas recipe and liven up your next piece of toast. Great on it’s own with a sprinkling of sumac or za’atar and also great with a poached egg! 

Yield:

Approx. 2 Cups


Prep Time: 15 min

Cooling Time: at least one hour to full day before. 

Good For:

Anytime & Snacks


Ingredients

Part 1

2 cups shelled fresh peas or frozen peas, thawed

1-4 garlic clove, roughly chopped*

2 teaspoons dried parsley or ¼ cup fresh flat leaf parsley

1-2 tablespoons extra-virgin olive oil

½ cup water

½-1 teaspoon salt 

Part 2

2 tablespoons sliced green onions or chives

Zest from a whole lemon 

1/4 teaspoon cayenne pepper**

Freshly ground black pepper

Your favourite bread, toasted

Spice toppers: Sumac or Za’atar spice blend

Step by Step Instructions

Step 1

Combine peas, garlic, parsley, 1 tablespoon oil, a pinch of salt, and 1/2 cup water in a small saucepan. Bring to a simmer and cook over medium heat, stirring occasionally, until peas are tender, about 5 minutes for fresh peas, about 2 minutes for frozen. 

    Step 2

    Drain, reserving cooking liquid.

      Step 3

      Transfer pea mixture to a food processor; add green onions or chives, lemon zest, cayenne pepper. Pulse until a coarse mixture forms. Scrape sides of bowl, add half of reserved liquid and continue pulsing. Repeat scraping the bowl and adding the remainder of reserved liquid and mix thoroughly.

        Step 4

        Transfer to a glass container with lid, let cool before adding lid and cool completely in refrigerator for at least an hour. 

        Step 5

        Grate the carrot and add to the bowl.  Stir to combine all three ingredients.

        FOR SERVING: Drizzle toast with oil; top with pea mash, sprinkle with sumac, za’atar or salt/pepper and drizzle with a bit more oil.

        DO AHEAD: Pea mash can be made 1 day ahead.


        NOTES:

        *More garlic the better I say – but you use however much you want.

        **eliminate if you don’t like spiciness

        Adapted from Bon Appetit

        ​​Disclaimer: This recipe post may contain affiliate links. We may receive a small commission when you make a purchase (No extra cost to you).
        Sushi Bake Recipe

        SUSHI BAKE

        Often served as a party or potluck dish, as it can be easily prepared in large quantities and served in small portions. It’s a fun and delicious way to enjoy the flavors of sushi without the hassle of rolling individual sushi rolls.

        Servings

        4 servings


        Ready In:

        45 – 60 min


        Good For:

        Dinner & Leftovers


        Ingredients

        Sushi Rice 

        1 cup sushi rice 

        1.5 cup water

        2 tablespoons rice vinegar

        1 tablespoon sugar

        ¼ teaspoon salt

        Chopped Topping 

        1 package imitation crab, flake style

        1 large carrot, finely shredded

        1 can (400g) artichoke hearts

        *or*

        2 cans (200g) bamboo shoots

        Mayo Mixture 

        ¼ cup mayonnaise

        few dashes of Everything Bagel Seasoning

        *or

        ¼ teaspoon onion powder

        ¼ teaspoon garlic powder

        ⅛ teaspoon smoked paprika

        Salt and pepper to taste

        Sprinkling 

        Furikake or finely chopped nori sheet

        Sesame seeds

        Step by Step Instructions

        Step 1

        Rinse sushi rice in a fine mesh strainer until water is clear. Add to a medium saucepan with water and follow instructions for time on your rice packaging. When fully cooked, remove from heat and set aside with lid off while preparing Chopped Toppings.

        Step 2

        Start preheating the oven to 350 degrees F / 175 degrees C. Lightly spray a small 1.5 litre/ 1 ½ qt casserole dish and set aside.

        Step 3

        Rinse and drain imitation crab in a strainer. Squeeze excess water from each piece, then tear apart to smaller sections and place in medium sized bowl.

        Step 4

        Rinse and drain the can of artichoke hearts. Roughly chop and add to the bowl. 

        Step 5

        Grate the carrot and add to the bowl.  Stir to combine all three ingredients.

        Step 6

        In a small bowl, mix together Mayo Mixture ingredients: mayonnaise and Everything Bagel Seasoning or add the individual spices or your own spice blend. Add to Chopped Toppings and stir to fully combine.

        Step 7

        Now that the rice has cooled, add the rice vinegar, sugar and salt and gently fold into the rice. Taste and adjust any of the seasonings to your liking. Place into the casserole dish and press into the edges. 

        Step 8

        Sprinkle about ¼ to ½ tsp of furikake and more sesame seeds if you like

        Step 9

        Pour Chopped Toppings on top and smooth to be even. Adding another ¼ to ½ tsp of furikake and sesame seeds.

        Step 10

        Bake for 20 minutes with a lid. Remove the lid and bake for 10 minutes more.

        Step 11

        Serve with ¼ sections of a nori sheet and/or sriracha.

        Step 12

        Best served hot but also great cooled or reheated (if there are any leftovers).

        NOTES

        Adapted from @EmmyMade

        ​​Disclaimer: This recipe post contains affiliate links. We may receive a small commission when you make a purchase (No extra cost to you).

        Fall Spiced Oatmeal & Chocolate Chip Muffins

        Fall Spiced Oatmeal & Chocolate Chip Muffins

        In just over half an hour you can have a dozen delicious muffins!

        Servings

        12 muffins

        Ready In:

        25-30 minutes

        Calories:

        Probably a bunch

        Good For:

        Snacks, Anytime

        About this Recipe

        This muffin recipe has the perfect blend of fall spices and hearty texture for a great snack anytime of the day.

        Make it your own by using your favourite seeds, nuts and chocolate chip varieties. 

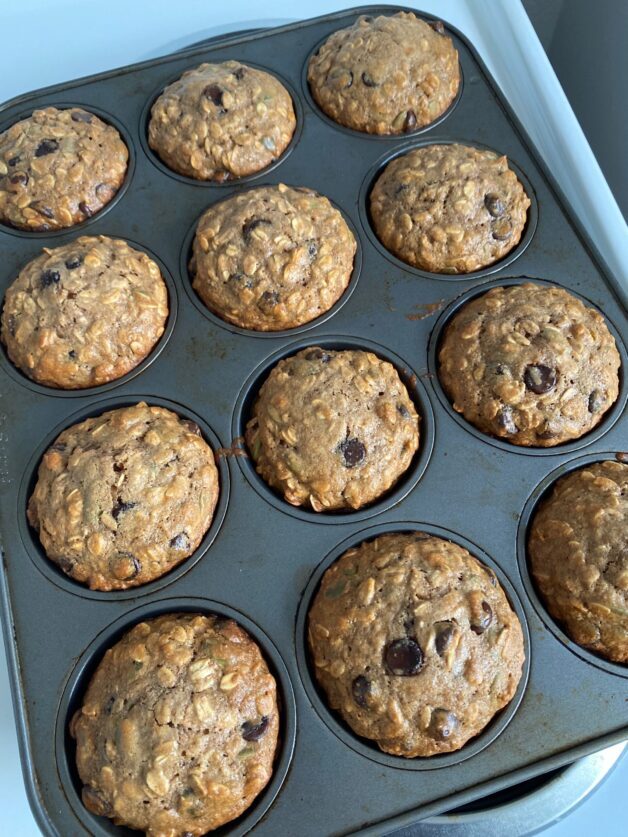
        A dozen freshly baked Fall Spiced Oat & Chocolate Chip Muffins

        Ingredients

        Part 1

        1/4 cup oil or melted butter

        1/2 cup brown sugar

        2 eggs

        1 cup yogurt

        1 teaspoon cinnamon

        1 teaspoon cardamom

        1/2 teaspoon nutmeg

        1/2 teaspoon cloves

        1/2 teaspoon salt

        Part 2

        1 cup whole wheat flour

        1–1/2 cups old-fashioned oats

        1–1/2 teaspoons baking powder

        1 teaspoon baking soda

        Part 3

        1 cup chocolate chips

        1/2 cup seeds or nuts

        Step by Step Instructions

        Step 1

        Set your oven to 350°F to preheat then grease a 12-cup muffin pan or line with paper liners and set aside.

        Step 2

        In a large bowl, whisk together the Part 1 ingredients: oil, brown sugar, eggs, yogurt, cinnamon, cardamom, cloves, nutmeg and salt.

        Step 3

        Now add the Part 2 ingredient: flour, oats, baking powder, and baking soda and stir until just combined

        Step 4

        Finally, fold in the Part 3 ingredients: chocolate chips and nuts/seeds.

        Step 5

        Divide batter evenly among greased muffins cups, filling each one almost full.

        Step 6

        Bake for 15-18 minutes or until muffins are golden brown.

        Step 7

        Let muffins cool in the pan for a few minutes then remove to a wire rack.

        Step 8

        Enjoy warm or let cool completely before storing in containers.

        NOTES
        • Contrary to most baking recipes, I like to mix all the wet ingredients and spices together and I’ve never had an issue with the results. Also – one less bowl to clean is great! However, if this is somehow sacrilegious to your way of baking – you do you.
        • My favourite combo for these muffins is using dark chocolate chips with either walnuts or pumpkin seeds.
        • I tend to prefer to store these in the fridge and recommend cutting in half to warm in the oven for a few minutes to enjoy at any time of the day. Delish!

        Small Batch Banana Nut Muffins

        Small Batch Banana Nut Muffin Recipe

        Whip up a cozy and comforting batch of these banana nut muffins – perfect for a lazy Sunday morning!

        Servings

        Six large or

        18-24 mini-muffins

        Ready In:

        30 – 45min


        Good For:

        Anytime


        Ingredients

        • 1 tablespoon ground flax seed
        • 3 tbsp water
        • 2 ripe bananas, mashed
        • 1/2 cup sugar
        • ¼ cup unsalted butter, melted
        • 1/2 teaspoon vanilla extract
        • 1/2 cup all purpose flour
        • 1/2 cup whole wheat flour
        • 1 teaspoon baking soda
        • 1/4 teaspoon salt
        • 1/4 cup walnuts, chopped

        Step by Step Instructions

        Step 1

        Preheat the oven to 350 degrees F (177 degrees C).

        Step 2

        Use liners, spray or lightly butter muffin tin.

        Step 3

        In a small bowl, combine ground flax and water. Set aside to thicken.

        Step 4

        In a large bowl, mix* the sugar and thawed bananas together until well blended.

        Step 4

        Ensure the flax mixture is evenly mixed, then combine it with the cooled melted butter, cinnamon, allspice, and vanilla in a bowl. Thoroughly blend the ingredients until well-combined.

        Step 5

        Switch to a spoon and gently incorporate the flour, baking soda, and salt until just combined.

        Step 6

        If adding chopped walnuts** gently fold in now

        Step 7

        Using a spoon, fill the muffin tins with batter, leaving 3/4 of the way full for larger muffins or filling to the lip for mini-muffins.

        Step 8

        Top each muffin with a few more chopped nut pieces

        Step 9

        Bake the muffins for 20-25 minutes if making large muffins, or 10-15 minutes for mini muffins, rotating the pans halfway through cooking time for even baking.”

        Step 10

        Once the muffin tops turn golden brown and a toothpick inserted into the center comes out clean, the muffins are done. Remove them from the tin and let them cool on a rack.

        Step 11

        Great to eat right away or store in container in fridge for a few days

        NOTES

        *Best to use a hand blender or whisk to get these ingredients very well blended 

        **Most chopped nuts would probably work – I just like walnuts the best in these